OpenMusic Documentation
Prev| Chapter 8. OM Music objects Chord-seq and Voice| Next
Tutorial 26: Editing rhythm with the Voice graphic editor
Topics
In this tutorial we will use an excerpt from the Chorale Allein Gott in der Hh’ sei Ehr’ from J.S. Bach’s German Organ Mass to learn how to enter rhythm when working in the Voice editor, a new addition to OM 4.4, developed by Carlos Agon.
Key Modules Used
The Concept:
 |
If you work in Finale |
|---|---|
While it is possible to edit musical objects in OM, if you are a Finale user,
it is often faster to use OM’s import and export capabilites to move objects
back and forth between OM and Finale, since Finale’s editing interface remains
slightly more fluid. See the Function References on finale-export and finale-import.
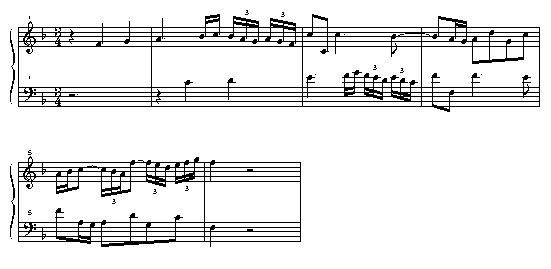
The goal is to recreate the following 5 measures from the Chorala:
We will create both staves separately in two different Voice editors and then combine the results into a Poly object. A Poly object is quite simply a stack of Voice objects. Its second input takes a list of Voice objects, which can then be played and edited together.
The Patch:
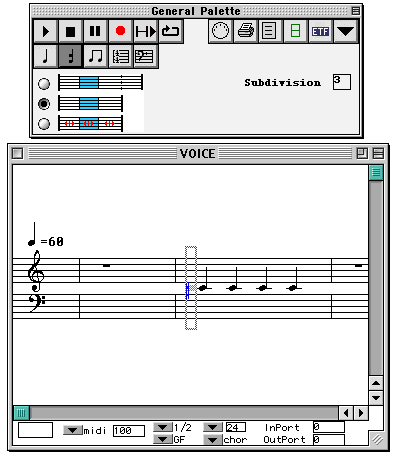
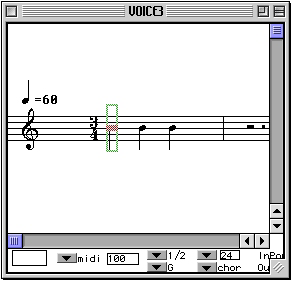
First, let’s look at the Voice editor window:
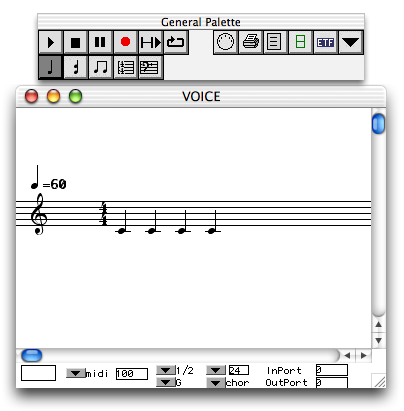
As with all editors, there are a series of buttons which control which what level we’re editing on:
-
 Note mode - used to edit individual notes of the sequence.
 -
 Chord mode - used to edit the Chords of the sequence.
 -
 Group mode - used to edit rhythmic groups within measures of the sequence.
 -
 Measure mode - used to edit entire measures of the sequence.
 -
 Voice mode - used edit the whole Voice at once.
 -
 Poly mode - This button is only present in Poly editors, and allows you to simultaneously edit the stack of Voices all at once.
These editing levels respect the natural heirarchy of OM objects, following a pattern of inheritance mentioned in the previous tutorials. When creating rhythms from scratch in OM, its best to use a strategy which respects this heirarchy:
-
First, change the time signature.
-
Second, create new measures.
-
Third, enter notes representing the basic rhythmic groups.
-
Fourth, subdivide those notes as necessary
-
Lastly, change pitches.
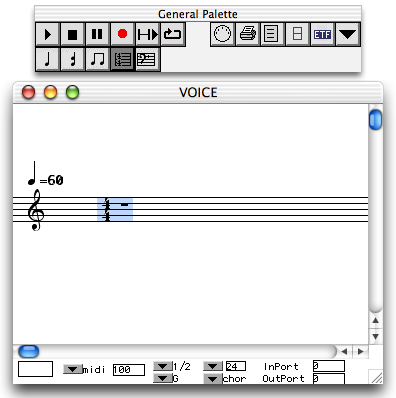
The time signature
In order to change the time signature we must select the measure mode as shown above. When this is done, two fields are shown in the palette, the numerator and denominator of the time signature:
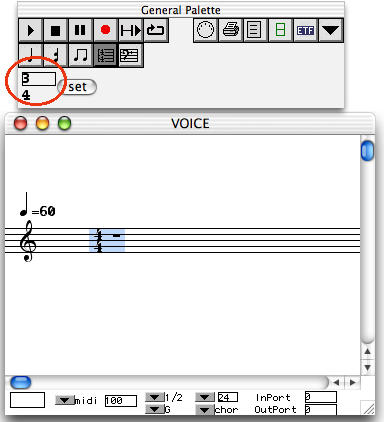
You enter the time signature by clicking on the numbers and dragging up or down. Then click set:
Adding new measures
Adding new items in general is done by holding option and clicking, and measures are no exception. With the measure tool still selected, option-click four times to the right of the existing measure to add new blank ones.
You may get a pop-up help screen at any time by hitting h :
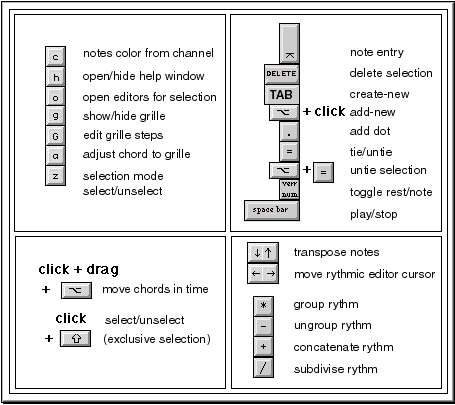
This menu lists the available commands. Some have not yet been implemented. In addition, some of the commands are only applicable when you are in edit mode (represented by a green or red box cursor - more on this below). Eventually someone will update this help screen.
Creating the basic rhythmic structure
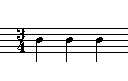
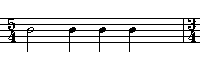
Next, we create a basic rhythmic structure representing the note groupings of the measure, which we will then subdivide to create the appropriate number and type of notes. For the upper voice of the Chorale, the basic rhythmic structure will be:


…whose notes we will then subdivide to create the finished rhythmic structure:


In addition to the various editing modes chosen with the tool buttons of the palette, there are two different cursor modes when editing. The default is the selection mode, which is available in all the tools. When in selection mode, objects that you click on or drag to enclose are highlighted in blue. The second mode is the edit mode, which is available only in the Note, Chord, and Group tools. You enter edit mode by option-clicking on or in between notes. A cursor appears, surrounded by a red box (if you are between notes, going to enter new ones) or a green box (if you clicked on a note, you’re going to change the note)
When in the edit mode, the cursor keys move you to the next/previous object, (with a green cursor) and the tab key moves you to the space between the current object and the next one (with a red cursor).
Click the Chord tool and option-click before the first rest of the first measure. You enter edit mode and the red cursor appears:
You’ll also notice three radio buttons appear on the palette. These buttons control the behavior of the measure when you enter new notes. They are, from top to bottom, Replace Notes, Extend Measure, and Keep Proportional Lengths.
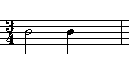
To demonstrate how these work, we’ll start with a hypothetical measure of 3/4 containing 3 quarter notes:
We will put the red cursor in front of the first note and type 6 , which will normally inserts a half-note.
In Replace Notes mode, the half note pushes the last two quarter notes out of the measure, deleting them. The measure length stays the same and the half note is entered:
In extend measure mode, the half note is added and the time signature is adjusted in order to accomodate the new note. The result is a bar of 5/4:
In Keep Proportional Lengths mode, no notes are deleted but the time signature does not change either. The proportions of the notes are kept the same relative to each other but they are adjusted as a group to fit in the measure. This usually results in the creation of a tuplet of some kind:

For our purposes, we want the first mode, Replace Notes.
When in edit mode, the notes of the keypad correspond to durations. They will add notes if you are between notes (red cursor) or change durations of notes if you are on a note (green cursor). They work as follows:
 |
|

—|—
 |
|

 |
|

 |
|

 |
|

 |
|

 |
|

First Measure
In edit mode, use 5 to enter a quarter note.
Hit tab (not the arrow keys) to move to the next insert point.
Insert a second quarter note.
Hit tab again to get to a new position
Insert a third quarter note.
Now, we need to change the first quarter note into a rest. Use ← to move the green cursor back to it:
…then hit screen lock on the keypad. Powerbook users can use function-clear (function-6).
Second Measure
Move the cursor to the last note of measure 1 with right arrow. Then hit tab to get it to the space before the beginning of measure 2.
Using tab between notes again, enter a quarter note and three eighth notes using 5 4 4 4.
Our measure now looks like:

Use left arrow to move the cursor back to the first note. Hit . (period) to add a dot.
Subdividing the structure
Now we need to subdivide these notes into the groupings of the Chorale. Come out of edit mode by clicking anywhere else in the window. Then click on the first eighth note. The note turns blue (you are in selection mode) Hit 2. When you hit a number key in selection mode, you subdivide the selected note(s) evenly. Hitting 2 on an eighth note changes it into two sixteenths. Click on the next eighth, then shift-click on the last eighth. They are both blue. Hit 3 to turn them both into triplet sixteenths.
The opposite of this operation is performed with + CLASS=”KEYCAP” >+. Select the notes you want to “put back together” and hit + CLASS=”KEYCAP” >+ to regroup them.
Ties are added in selection mode by hitting = with the two notes selected, or in edit mode with the first note of the tie in the green cursor.

Entering pitches
Pitches are entered by dragging notes or groups of notes with the mouse or selecting them and using the cursor keys. Holding shift while using the cursor keys moves them by octaves.
You can control how enharmonics are spelled in the Preferences pane:
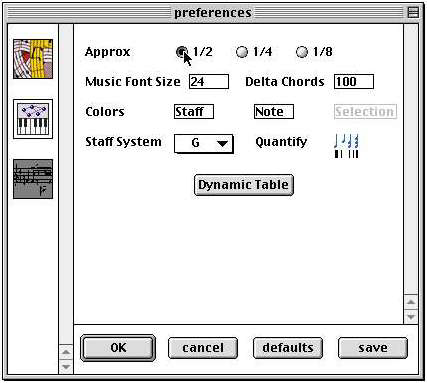
Double-click the 1/2 button to bring up the enharmonic alterations editor:
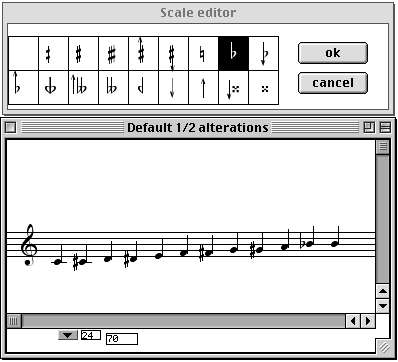
This is where you choose how you want OM to display certain midic values. Select the A sharp; and type o. The scale editor window opens. Select the flat; from the list. The A sharp; becomes an A flat;. Select it and hit the uparrow key so that it becomes a B flat. After closing this panel don’t forget to hit OK in the main Pane.
Now all A sharps will be notated as B flats
Using the same procedure, enter the lower voice in the other Voice box. When you are done, make sure they are both locked, and evaluate the Poly. You will create a two-voice object containing both Voices.
Prev| Home| Next
—|—|—
Tutorial 25: Voice II| Up| Tutorial
27: Introduction to rhythm quantification