OpenMusic Tutorials
Prev| Chapter 8. OM Music objects Chord-seq and Voice| Next
Tutorial 27: Introduction to rhythm quantification
Topics
Converting lists of durations into traditional rhythmic notation; passing data between Chord-seq nad Voice.
Key Modules Used
The Concept:
The omquantify function converts a list of durations, in
milliseconds, into a rhythm tree (treating positive integers as durations and
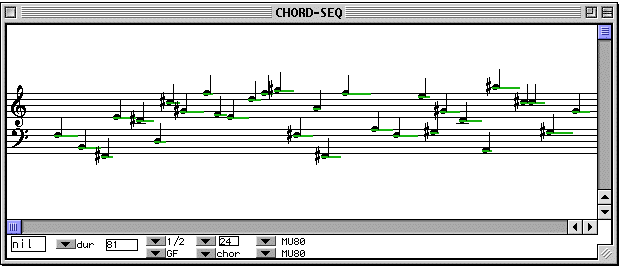
negative integers as rests). In this example we will quantify a Chord-
seq (A) from Tutorial 13 using two different settings.
Remember that Chord-seq does not recognize negative
integers as rests; its _ldur_ output is simply the durations of the notes,
without regard for where they fall. The omquantify
function treates the duration list as consecutive durations that are ‘flush’
with each other. If ther are gaps in the original Chord-seq, then, the transcription will not be accurate.
As described further down, there is another way to transmit data from a
Chord-seq to a Voice; this is to plug
the _self_ output of the Chord-seqinto the _self_
input of the Voice. This method has the advantage of
preserving the real start times (onsets) of all notes regardless of whether
they are ‘flush’ with their neighbors. However, each note is transcribed to
last until the onset of the next; i.e. the transcription will not have any
rests.
The Patch:
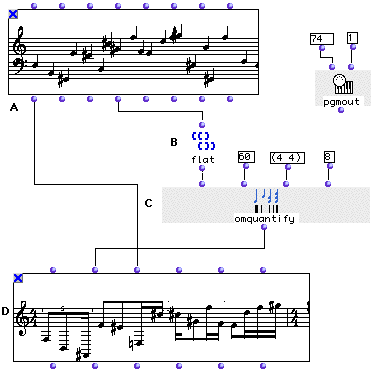
In order to quantify from a Chord-seq, we will use the
list of durations that we get evaluating its fourth output, _ldur_. Each of
these durations corresponds to a note in the Chord-seq.
In some cases there might be rests in the sequence. As mentioned above, using
this method (using only the _ldur_ output of Chord-seq)
we will get an inaccurate result. Therefore we will check the Chord-
seq (A) in its editor and select the dur item from the pop-
up menu. We verify that all notes fall one after another (are ‘flush’ with
each other) forming a monodic sequence without rests:
We will then connect the fourth output _ldur_ of the Chord-seq (A) to flat (B) in order to get a simple list of
durations.
flat (B) is connected to the first input of
omquantify (C). At the second input we will enter 60
indicating a tempo for the transciption. The third input is for the time
signature. The fourth input is the maximum limit (exclusive) of for
subdividing the pulse, in this case, by 8, or into 32nd notes.
As mentioned above, you can connect a Chord-seq directly
to a Voice via the _self_ input:
In this case, an omquantify is automatically performed on
the material. The settings for this automatic omquantify
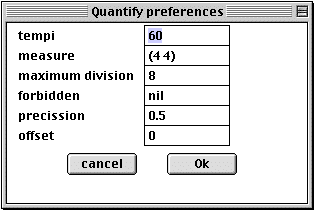
are in the Preferences Pane. Click the icon:

and then the quantify icon: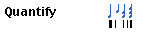
A preferences panel appears where you can edit the default settings:
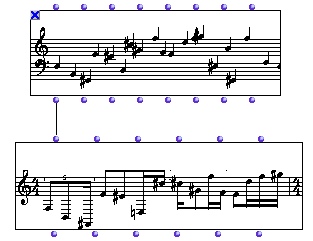
If we connect our Chord-seq directly to the _self_
input of the Voice:
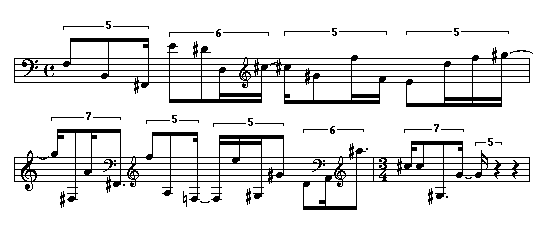
We get the following transcription with the defaults:
In the bottom half of the patch window, we clean up the transcription by
adjusting some settings with the additional inputs (added with option- ->
) of omquantify:
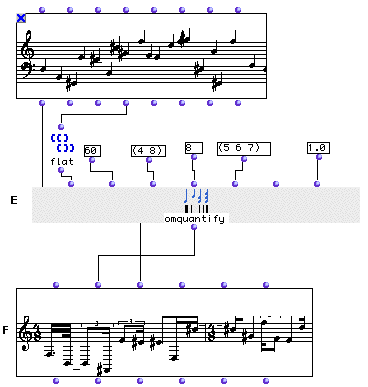
You’ll often have to fool around with tempo and time signature settings before
you get a decent transcription out of omquantify. In the
example above we have used the fifth and the seventh optional inputs of
omquantify. The fifth input, _forbid_ is a list of
forbidden subdivisions of the pulse (here quintuplets, sextuplets and
septuplets are forbidden). The seventh input, _precis_ , is a level of
precision, which is a value between 0 and 1, inclusive. 1 is the highest level
of precision, with accurate but complicated results. 0 is the least precise,
yielding simple but less accurate results. In our case, we changed the time
signature to (4 8). We did this so that the unit of the pulse would be the 8th
note and the smallest permitted division (which is 8) is thus equal to a 64th
note. If your settings don’t allow room for the smallest note values of the
original, omquantify may drop some notes, but it always
lets you know in the Listener:
? Warning: with the given constraints, 5 notes are lost while quantizing
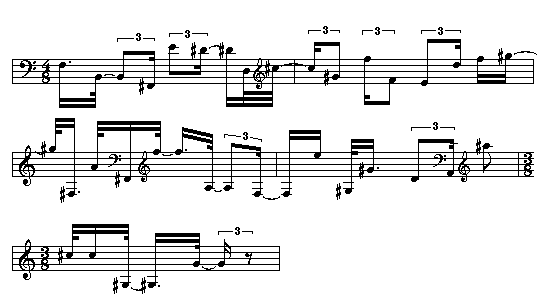
Our new transcription is:
| Prev | Home | Next |
|---|---|---|
| Tutorial 26: Editing rhythm with the Voice graphic editor | ||
| Up | Playing MIDI II |